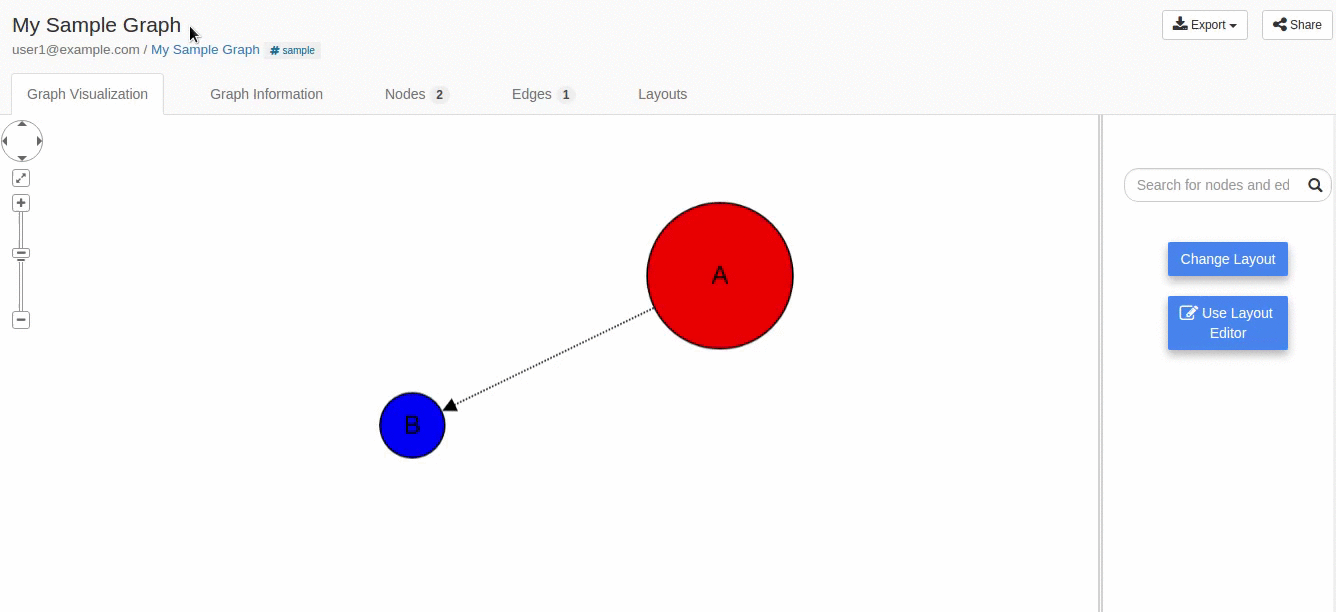
Start here to begin working with graphspace-python.
Connecting to GraphSpace
You can connect to GraphSpace using your username and password.
>>> from graphspace_python.api.client import GraphSpace
>>> graphspace = GraphSpace('user1@example.com', 'user1')
You can also set the api host using the set_api_host()
method if you are using a different server.
>>> graphspace.set_api_host('localhost:8000')
Creating a graph
Create an empty graph with no nodes and no edges.
>>> from graphspace_python.graphs.classes.gsgraph import GSGraph
>>> G = GSGraph()
Nodes
You can add one node at a time using the
add_node() method.
>>> # Adding a node 'a' with a given popup and label
>>> G.add_node('a', popup='sample node popup text', label='A')
>>> G.nodes(data=True)
[('a', {'id': 'a', 'popup': 'sample node popup text', 'name': 'a',
'label': 'A'})]
>>> # Adding style information for node 'a'
>>> G.add_node_style('a', shape='ellipse', color='red', width=90, height=90)
>>> G.get_style_json()
{'style': [{'style': {'border-color': '#000000', 'border-width': 1, 'height': 90,
'width': 90, 'shape': 'ellipse', 'border-style': 'solid', 'text-wrap': 'wrap',
'text-halign': 'center', 'text-valign': 'center', 'background-color': 'red'},
'selector': 'node[name="a"]'}]}
>>> # Adding a node 'b' with a given popup and label
>>> G.add_node('b', popup='sample node popup text', label='B')
>>> G.nodes(data=True)
[('a', {'id': 'a', 'popup': 'sample node popup text', 'name': 'a',
'label': 'A'}), ('b', {'id': 'b', 'popup': 'sample node popup text',
'name': 'b', 'label': 'B'})]
>>> # Adding style information for node 'b'
>>> G.add_node_style('b', shape='ellipse', color='blue', width=40, height=40)
>>> G.get_style_json()
{'style': [{'style': {'border-color': '#000000', 'border-width': 1, 'height': 90,
'width': 90, 'shape': 'ellipse', 'border-style': 'solid', 'text-wrap': 'wrap',
'text-halign': 'center', 'text-valign': 'center', 'background-color': 'red'},
'selector': 'node[name="a"]'}, {'style': {'border-color': '#000000', 'border-width'
: 1, 'height': 40, 'width': 40, 'shape': 'ellipse', 'border-style': 'solid',
'text-wrap': 'wrap', 'text-halign': 'center', 'text-valign': 'center', 'background-
color': 'blue'}, 'selector': 'node[name="b"]'}]}
Edges
You can also add one edge at a time using the
add_edge() method.
>>> G.add_edge('a', 'b', directed=True, popup='sample edge popup')
>>> # Accessing edges
>>> G.edges(data=True)
[('a', 'b', {'source': 'a', 'popup': 'sample edge popup', 'is_directed':
True, 'target': 'b'})]
>>> # Direct access using subscript notation
>>> G['a']
{'b': {'source': 'a', 'popup': 'sample edge popup', 'is_directed': True,
'target': 'b'}}
>>> G['a']['b']
{'source': 'a', 'popup': 'sample edge popup', 'is_directed': True,
'target': 'b'}
>>> # Adding style information for edge
>>> G.add_edge_style('a', 'b', directed=True, edge_style='dotted')
>>> G.get_style_json()
{'style': [{'style': {'border-color': '#000000', 'border-width': 1, 'height': 90,
'width': 90, 'shape': 'ellipse', 'border-style': 'solid', 'text-wrap': 'wrap',
'text-halign': 'center', 'text-valign': 'center', 'background-color': 'red'},
'selector': 'node[name="a"]'}, {'style': {'border-color': '#000000', 'border-width'
: 1, 'height': 40, 'width': 40, 'shape': 'ellipse', 'border-style': 'solid',
'text-wrap': 'wrap', 'text-halign': 'center', 'text-valign': 'center', 'background-
color': 'blue'}, 'selector': 'node[name="b"]'}, {'style': {'width': 1.0, 'line-
color': '#000000', 'target-arrow-shape': 'triangle', 'line-style': 'dotted',
'target-arrow-fill': 'filled', 'target-arrow-color': '#000000'}, 'selector':
'edge[source="a"][target="b"]'}]}
Graph Information
You can add more meaningful information about the graph like name, description and tags.
>>> G.set_name('My Sample Graph')
>>> G.get_name()
'My Sample Graph'
>>> G.set_tags(['sample'])
>>> G.get_tags()
['sample']
>>> G.set_data(data={
...     'description': 'my sample graph'
... })
>>> G.get_data()
{'description': 'my sample graph', 'name': 'My Sample Graph', 'tags': ['sample']}
Saving a graph on GraphSpace
You can save your graph online using the
post_graph() method.
>>> graph = graphspace.post_graph(G)
>>> graph.get_name()
u'My Sample Graph'
>>> graph.id
29824
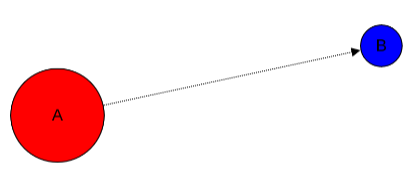
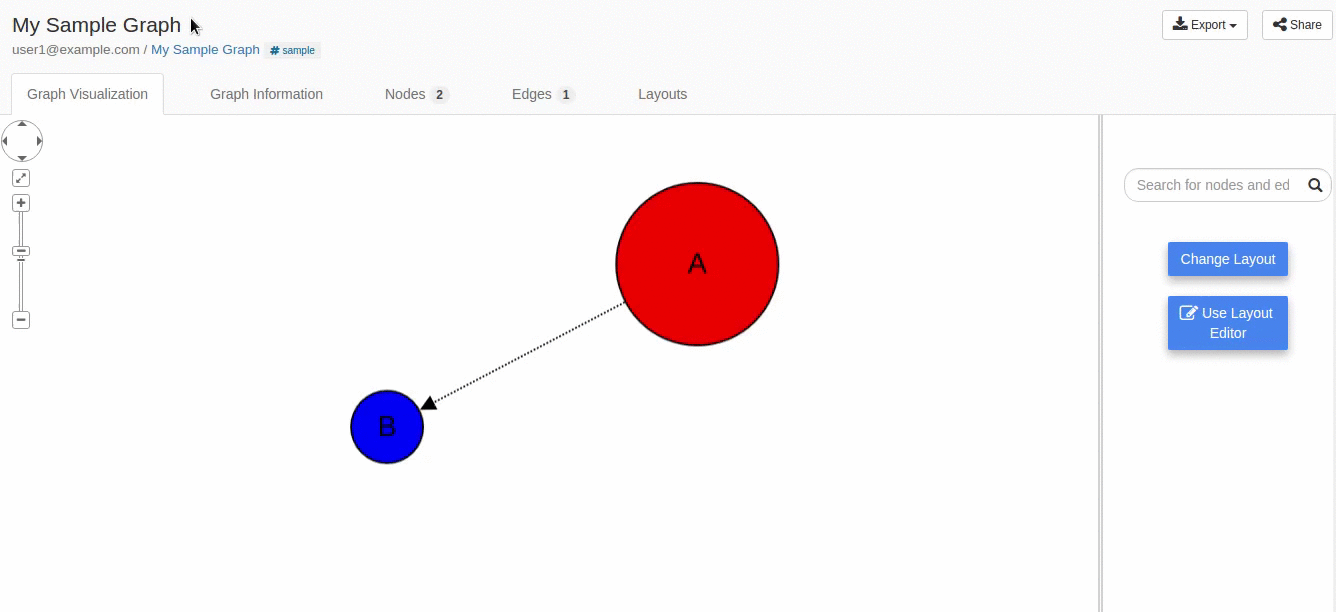
The saved graph will look like this on GraphSpace:
Fetching a graph from GraphSpace
You can retrieve your saved graph anytime from GraphSpace using the
get_graph() method.
>>> graph = graphspace.get_graph(graph_name='My Sample Graph')
>>> graph.get_name()
u'My Sample Graph'
>>> graph.id
29824
>>> graph.get_is_public()
0
>>> graph.get_graph_json()
{u'elements': {u'nodes': [{u'data': {u'popup': u'sample node popup text', u'name':
u'a', u'id': u'a', u'label': u'A'}}, {u'data': {u'popup': u'sample node popup
text', u'name': u'b', u'id': u'b', u'label': u'B'}}], u'edges': [{u'is_directed':
0, u'data': {u'source': u'a', u'popup': u'sample edge popup', u'is_directed': True,
u'target': u'b', u'name': u'a-b'}}]}, u'data': {u'tags': [u'sample'], u'description'
: u'my sample graph', u'name': u'My Sample Graph'}}
>>> graph.get_style_json()
{u'style': [{u'style': {u'border-color': u'#000000', u'border-style': u'solid',
u'border-width': 1, u'width': 90, u'shape': u'ellipse', u'text-wrap': u'wrap',
u'text-halign': u'center', u'height': 90, u'text-valign': u'center', u'background-
color': u'red'}, u'selector': u'node[name="a"]'}, {u'style': {u'border-color':
u'#000000', u'border-style': u'solid', u'border-width': 1, u'width': 40, u'shape':
u'ellipse', u'text-wrap': u'wrap', u'text-halign': u'center', u'height': 40,
u'text-valign': u'center', u'background-color': u'blue'}, u'selector': u'node
[name="b"]'}, {u'style': {u'line-color': u'#000000', u'target-arrow-shape':
u'triangle', u'target-arrow-fill': u'filled', u'width': 1.0, u'line-style':
u'dotted', u'target-arrow-color': u'#000000'}, u'selector': u'edge[source="a"]
[target="b"]'}]}
You can retrieve a graph by id as well.
>>> graph = graphspace.get_graph(graph_id=29824)
Updating a graph on GraphSpace
You can also update your graph anytime using the
update_graph() method.
>>> G = GSGraph()
>>> G.add_node('a', popup='sample node popup text', label='A updated')
>>> G.add_node_style('a', shape='ellipse', color='green', width=90, height=90)
>>> G.add_node('b', popup='sample node popup text', label='B updated')
>>> G.add_node_style('b', shape='ellipse', color='yellow', width=40, height=40)
>>> G.add_edge('a', 'b', directed=True, popup='sample edge popup')
>>> G.add_edge_style('a', 'b', directed=True, edge_style='dotted')
>>> G.set_name('My Sample Graph')
>>> G.set_data(data={
...    'description': 'my sample graph'
... })
>>> G.set_is_public(1)
>>> graph = graphspace.update_graph(G)
>>> graph.get_name()
u'My Sample Graph'
>>> graph.get_is_public()
1
>>> graph.get_data()
{u'description': u'my sample graph', 'name': u'My Sample Graph', 'tags': [u'sample']}
>>> graph.get_graph_json()
{'elements': {'nodes': [{u'data': {u'popup': u'sample node popup text', u'name':
u'a', u'id': u'a', u'label': u'A updated'}}, {u'data': {u'popup': u'sample node
popup text', u'name': u'b', u'id': u'b', u'label': u'B updated'}}], 'edges': [{
u'data': {u'source': u'a', u'popup': u'sample edge popup', u'is_directed': True,
u'target': u'b', u'name': u'a-b'}, u'is_directed': 0}]}, 'data': {u'description':
u'my sample graph', 'name': u'My Sample Graph', 'tags': [u'sample']}}
>>> graph.get_style_json()
{u'style': [{u'style': {u'border-color': u'#000000', u'border-style': u'solid',
u'border-width': 1, u'width': 90, u'shape': u'ellipse', u'text-wrap': u'wrap',
u'text-halign': u'center', u'height': 90, u'text-valign': u'center', u'background-
color': u'green'}, u'selector': u'node[name="a"]'}, {u'style': {u'border-color':
u'#000000', u'border-style': u'solid', u'border-width': 1, u'width': 40, u'shape':
u'ellipse', u'text-wrap': u'wrap', u'text-halign': u'center', u'height': 40,
u'text-valign': u'center', u'background-color': u'yellow'}, u'selector': u'node
[name="b"]'}, {u'style': {u'line-color': u'#000000', u'target-arrow-shape':
u'triangle', u'target-arrow-fill': u'filled', u'width': 1.0, u'line-style':
u'dotted', u'target-arrow-color': u'#000000'}, u'selector': u'edge[source="a"]
[target="b"]'}]}
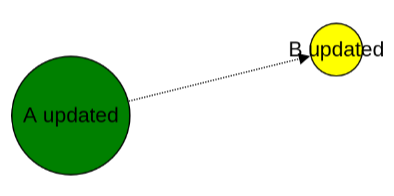
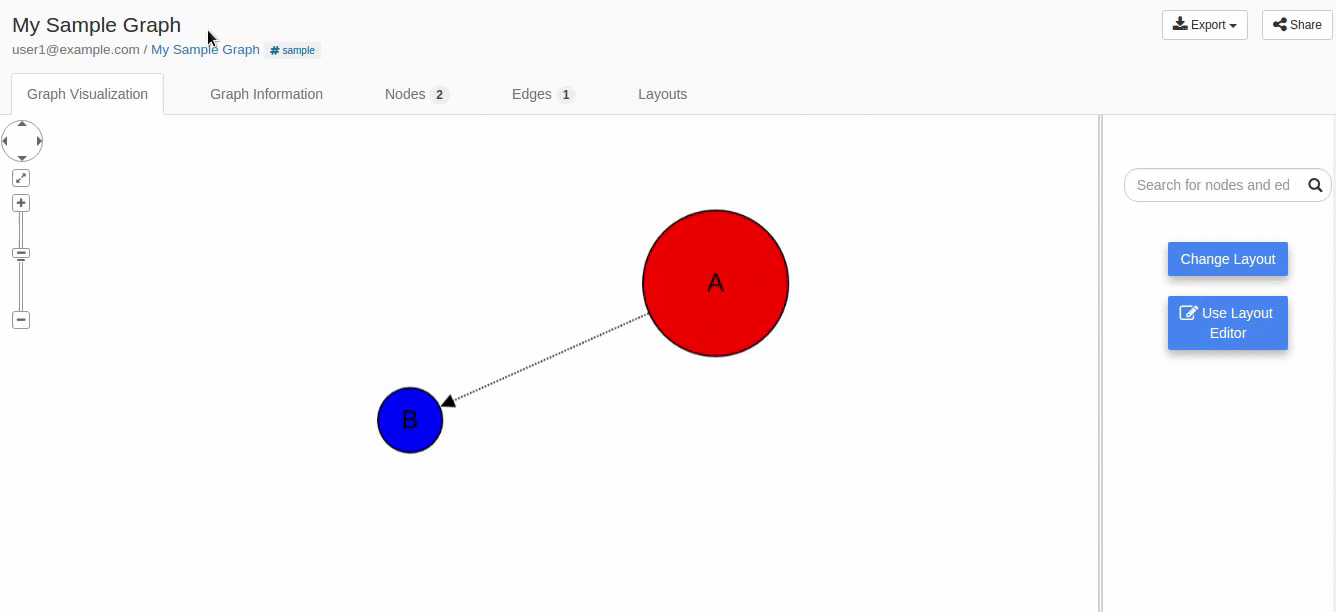
The updated graph will look like this on GraphSpace:
Here is another example.
>>> # Retrieving graph
>>> graph = graphspace.get_graph(graph_name='My Sample Graph')
>>> # Modifying the retrieved graph object
>>> graph.add_node('z', popup='sample node popup text', label='Z')
>>> graph.add_node_style('z', shape='ellipse', color='green', width=90, height=90)
>>> graph.add_edge('a', 'z', directed=True, popup='sample edge popup')
>>> graph.add_edge_style('a', 'z', directed=True, edge_style='dotted')
>>> graph.set_is_public(1)
>>> # Updating graph
>>> graph1 = graphspace.update_graph(graph)
>>> graph1.get_name()
u'My Sample Graph'
>>> graph1.get_is_public()
1
>>> graph1.nodes(data=True)
[(u'a', {u'popup': u'sample node popup text', u'name': u'a', u'id': u'a',
u'label': u'A'}), (u'b', {u'popup': u'sample node popup text', u'name':
u'b', u'id': u'b', u'label': u'B'}), (u'z', {u'popup': u'sample node
popup text', u'name': u'z', u'id': u'z', u'label': u'Z'})]
>>> graph1.edges(data=True)
[(u'a', u'b', {u'source': u'a', u'popup': u'sample edge popup',
u'is_directed': True, u'target': u'b', u'name': u'a-b'}),
(u'a', u'z', {u'source': u'a', u'popup': u'sample edge popup',
u'is_directed': True, u'target': u'z', u'name': u'a-z'})]
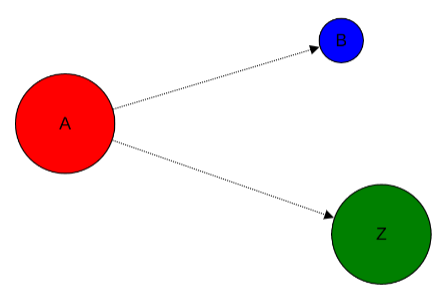
The updated graph in this case will look like this on GraphSpace:
If you also provide ‘graph_name’ or ‘graph_id’ as param then the update will be performed for that graph having the given name or id:
>>> graph = graphspace.update_graph(G, graph_id=29824)
Making a graph public on GraphSpace
You can also make a graph public using the
publish_graph() method.
>>> graphspace.publish_graph(graph_name='My Sample Graph')
>>> assert graphspace.get_graph(graph_name='My Sample Graph').is_public == 1
You can make a graph public by id as well.
>>> graphspace.publish_graph(graph_id=29824)
You can also make a graph public by passing the graph object itself as param.
>>> graph = graphspace.get_graph(graph_name='My Sample Graph')
>>> graphspace.publish_graph(graph=graph)
Making a graph private on GraphSpace
You can also make a graph private using the
unpublish_graph() method.
>>> graphspace.unpublish_graph(graph_name='My Sample Graph')
>>> assert graphspace.get_graph(graph_name='My Sample Graph').is_public == 0
You can make a graph private by id as well.
>>> graphspace.unpublish_graph(graph_id=29824)
You can also make a graph private by passing the graph object itself as param.
>>> graph = graphspace.get_graph(graph_name='My Sample Graph')
>>> graphspace.unpublish_graph(graph=graph)
Setting a default layout for a graph
You can set a default layout for a graph using the
set_default_graph_layout() method.
>>> graph = graphspace.set_default_graph_layout(graph_name='My Sample Graph', layout_id=1087)
>>> graph.default_layout_id
1087
You can set a default layout for a graph by graph id as well.
>>> graph = graphspace.set_default_graph_layout(graph_id=65930, layout_id=1087)
>>> graph.default_layout_id
1087
You can set a default layout for a graph by passing graph object itself as param.
>>> graph = graphspace.get_graph(graph_name='My Sample Graph')
>>> graph = graphspace.set_default_graph_layout(graph=graph, layout_id=1087)
>>> graph.default_layout_id
1087
Similarly you can use layout name instead of id.
>>> graph = graphspace.set_default_graph_layout(graph_id=65930, layout_name='My Sample Layout')
>>> graph.default_layout_id
1087
Or you can only pass layout object provided the object has ‘graph_id’ attribute and layout ‘name’ or ‘id’ attribute as well.
>>> layout = graphspace.get_graph_layout(graph_id=65930, layout_name='My Sample Layout')
>>> graph = graphspace.set_default_graph_layout(layout=layout)
>>> graph.default_layout_id
1087
Unset default layout for a graph
You can unset default layout for a graph using the
unset_default_graph_layout() method.
>>> graph = graphspace.unset_default_graph_layout(graph_name='My Sample Graph')
>>> assert graph.default_layout_id is None
You can unset default layout for a graph by graph id as well.
>>> graph = graphspace.unset_default_graph_layout(graph_id=65930)
You can also pass the graph object itself as param.
>>> graph = graphspace.get_graph(graph_name='My Sample Graph')
>>> graph = graphspace.unset_default_graph_layout(graph=graph)
Deleting a graph on GraphSpace
You can also delete your graph anytime using the
delete_graph() method.
>>> graphspace.delete_graph(graph_name='My Sample Graph')
u'Successfully deleted graph with id=29824'
>>> assert graphspace.get_graph(graph_name='My Sample Graph') is None
You can delete a graph by id as well.
>>> graphspace.delete_graph(graph_id=29824)
u'Successfully deleted graph with id=29824'
You can also delete a graph by passing the graph object itself as param.
>>> graph = graphspace.get_graph(graph_name='My Sample Graph')
>>> graphspace.delete_graph(graph=graph)
u'Successfully deleted graph with id=29824'
Creating a layout
Create an empty layout with no node positions and style properties.
>>> from graphspace_python.graphs.classes.gslayout import GSLayout
>>> L = GSLayout()
Node Positions
You can set position of one node at a time using the
set_node_position() method.
>>> # Setting position of a node 'a' with y and x coordinates
>>> L.set_node_position('a', y=38.5, x=67.3)
>>> # Setting position of a node 'b' with y and x coordinates
>>> L.set_node_position('b', y=124, x=332.2)
>>> L.get_positions_json()
{'a': {'y': 38.5, 'x': 67.3}, 'b': {'y': 124, 'x': 332.2}}
Note
Setting position of an already present node will update its position.
Style
You can also add style for a node or an edge by using the
add_node_style() and
add_edge_style() methods.
>>> L.add_node_style('a', shape='ellipse', color='green', width=60, height=60)
>>> L.add_edge_style('a', 'b', directed=True, edge_style='dashed')
>>> L.get_style_json()
{'style': [{'style': {'border-color': '#000000', 'border-width': 1, 'height': 60,
'width': 60, 'shape': 'ellipse', 'border-style': 'solid', 'text-wrap': 'wrap',
'text-halign': 'center', 'text-valign': 'center', 'background-color': 'green'},
'selector': 'node[name="a"]'}, {'style': {'width': 1.0, 'line-color': '#000000',
'target-arrow-shape': 'triangle', 'line-style': 'dashed', 'target-arrow-fill':
'filled', 'target-arrow-color': '#000000'}, 'selector': 'edge[source="a"][target="b"]'}]}
Layout Information
You can add more meaningful information about the layout like name, sharing status.
>>> L.set_name('My Sample Layout')
>>> L.get_name()
'My Sample Layout'
>>> L.set_is_shared(1)
>>> L.get_is_shared()
1
Saving a layout on GraphSpace
You can save your layout online using the
post_graph_layout() method.
>>> layout = graphspace.post_graph_layout(L, graph_id=21722)
>>> layout.get_name()
u'My Sample Layout'
>>> layout.id
1068
The saved layout will look like this on GraphSpace:
You can also save your layout when graph name is known.
>>> layout = graphspace.post_graph_layout(L, graph_name='My Sample Graph')
You can also save your layout by passing graph object as param.
>>> graph = graphspace.get_graph(graph_name='My Sample Graph')
>>> layout = graphspace.post_graph_layout(L, graph=graph)
Fetching a layout from GraphSpace
You can retrieve your saved layout anytime from GraphSpace using the
get_graph_layout() method.
>>> layout = graphspace.get_graph_layout(layout_name='My Sample Layout', graph_id=21722)
>>> layout.get_name()
u'My Sample Layout'
>>> layout.id
1068
>>> layout.get_is_shared()
1
>>> layout.get_positions_json()
{u'a': {u'y': 38.5, u'x': 67.3}, u'b': {u'y': 124, u'x': 332.2}}
>>> layout.get_style_json()
{u'style': [{u'style': {u'border-color': u'#000000', u'border-width': 1, u'height':
60, u'shape': u'ellipse', u'width': 60, u'border-style': u'solid', u'text-wrap':
u'wrap', u'text-halign': u'center', u'text-valign': u'center', u'background-color':
u'green'}, u'selector': u'node[name="a"]'}, {u'style': {u'line-color': u'#000000',
u'target-arrow-shape': u'triangle', u'target-arrow-fill': u'filled', u'width': 1.0,
u'line-style': u'dashed', u'target-arrow-color': u'#000000'}, u'selector':
u'edge[source="a"][target="b"]'}]}
You can retrieve a layout by id as well.
>>> layout = graphspace.get_graph_layout(layout_id=1068, graph_id=21722)
You can also retrieve a layout by providing graph name instead of id.
>>> layout = graphspace.get_graph_layout(layout_id=1068, graph_name='My Sample Graph')
You can also retrieve a layout by passing the graph object as param.
>>> graph = graphspace.get_graph(graph_name='My Sample Graph')
>>> layout = graphspace.get_graph_layout(layout_id=1068, graph=graph)
Updating a layout on GraphSpace
You can also update your layout anytime using the
update_graph_layout() method.
>>> L = GSLayout()
>>> L.set_node_position('b', y=38.5, x=67.3)
>>> L.set_node_position('a', y=102, x=238.1)
>>> L.add_node_style('a', shape='octagon', color='green', width=60, height=60)
>>> L.add_edge_style('a', 'b', directed=True, edge_style='solid')
>>> L.set_name('My Sample Layout')
>>> L.set_is_shared(1)
>>> layout = graphspace.update_graph_layout(L, graph_id=21722)
>>> layout.get_name()
u'My Sample Layout'
>>> layout.get_is_shared()
1
>>> layout.get_positions_json()
{u'a': {u'y': 102, u'x': 238.1}, u'b': {u'y': 38.5, u'x': 67.3}}
>>> layout.get_style_json()
{u'style': [{u'style': {u'border-color': u'#000000', u'border-width': 1, u'height':
60, u'shape': u'octagon', u'width': 60, u'border-style': u'solid', u'text-wrap':
u'wrap', u'text-halign': u'center', u'text-valign': u'center', u'background-color':
u'green'}, u'selector': u'node[name="a"]'}, {u'style': {u'line-color': u'#000000',
u'target-arrow-shape': u'triangle', u'target-arrow-fill': u'filled', u'width': 1.0,
u'line-style': u'solid', u'target-arrow-color': u'#000000'}, u'selector':
u'edge[source="a"][target="b"]'}]}
The updated layout will look like this on GraphSpace:
Here is another example.
>>> # Retrieving layout
>>> layout = graphspace.get_graph_layout(graph_id=21722, name='My Sample Layout')
>>> # Modifying the retrieved layout object
>>> layout.set_node_position('b', y=30, x=67)
>>> layout.set_node_position('a', y=30, x=211)
>>> layout.add_node_style('a', shape='roundrectangle', color='green', width=45, height=45)
>>> layout.add_edge_style('a', 'b', directed=True, edge_style='solid')
>>> # Updating layout
>>> layout1 = graphspace.update_graph_layout(layout)
>>> layout1.get_positions_json()
{u'a': {u'y': 30, u'x': 211}, u'b': {u'y': 30, u'x': 67}}
The updated layout in this case will look like this on GraphSpace:
If you also provide ‘layout_name’ or ‘layout_id’ as param then the update will be performed for that layout having the given name or id:
>>> layout = graphspace.update_graph_layout(L, layout_id=1068, graph_id=21722)
Deleting a layout on GraphSpace
You can also delete your layout anytime using the
delete_graph_layout() method.
>>> graphspace.delete_graph_layout(layout_name='My Sample Layout', graph_id=21722)
u'Successfully deleted layout with id=1068'
>>> assert graphspace.get_graph_layout(graph_id=21722, name='My Sample Layout') is None
You can delete a layout by id as well.
>>> graphspace.delete_graph_layout(layout_id=1068, graph_id=21722)
u'Successfully deleted layout with id=1068'
You can also delete a layout by passing only the layout object as param provided the object has ‘graph_id’ attribute and layout ‘name’ or ‘id’ attribute.
>>> layout = graphspace.get_graph_layout(layout_name='My Sample Layout', graph_id=21722)
>>> graphspace.delete_graph_layout(layout=layout)
u'Successfully deleted layout with id=1068'
You can also use graph name instead of id.
>>> graphspace.delete_graph_layout(layout_id=1068, graph_name='My Sample Graph')
u'Successfully deleted layout with id=1068'
Or you can also pass the graph object as param.
>>> graph = graphspace.get_graph(graph_name='My Sample Graph')
>>> graphspace.delete_graph_layout(layout_id=1068, graph=graph)
u'Successfully deleted layout with id=1068'
Creating a group
Create a group providing the name and description.
>>> from graphspace_python.graphs.classes.gsgroup import GSGroup
>>> group = GSGroup(name='My first group', description='sample group')
You can also set name and description of the group using the
set_name() and
set_description() methods.
>>> group = GSGroup()
>>> group.set_name('My first group')
>>> group.get_name()
'My first group'
>>> group.set_description('sample group')
>>> group.get_description()
'sample group'
Saving a group on GraphSpace
You can save your group online using the
post_group() method.
>>> group1 = graphspace.post_group(group)
>>> group1.get_name()
u'My first group'
>>> group1.id
318
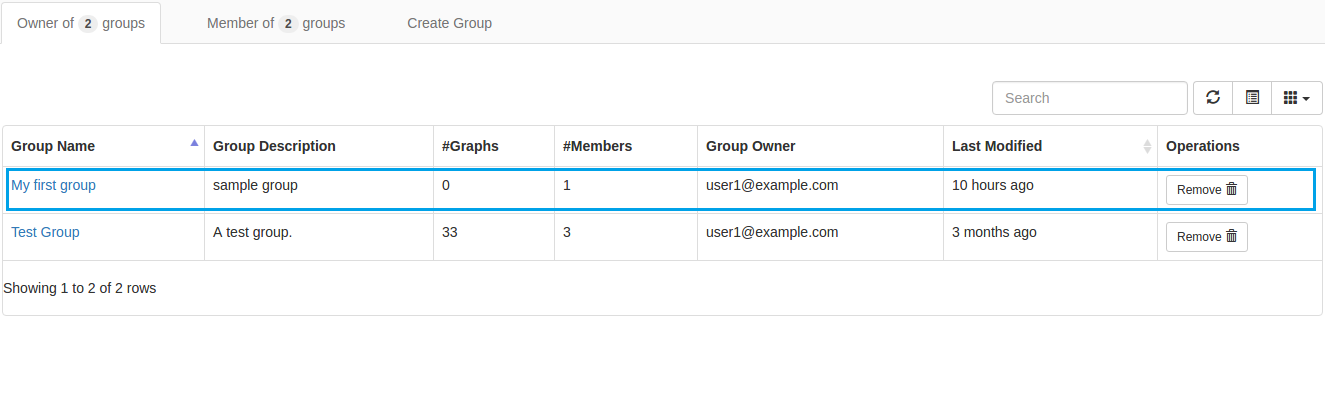
You can also view your saved group on GraphSpace.
Fetching a group from GraphSpace
You can retrieve your saved group anytime from GraphSpace using the
get_group() method.
>>> group = graphspace.get_group(group_name='My first group')
>>> group.get_name()
u'My first group'
>>> group.id
318
>>> group.get_description()
u'sample group'
You can retrieve a group by id as well.
>>> group = graphspace.get_group(group_id=318)
Updating a group on GraphSpace
You can also update your group anytime using the
update_group() method.
>>> group = GSGroup(name='My first group', description='updated description')
>>> group1 = graphspace.update_group(group)
>>> group1.get_description()
u'updated description'
Here is another example.
>>> group = graphspace.get_group(name='My first group')
>>> group.set_description('updated description')
>>> group1 = graphspace.update_group(group)
>>> group1.get_description()
u'updated description'
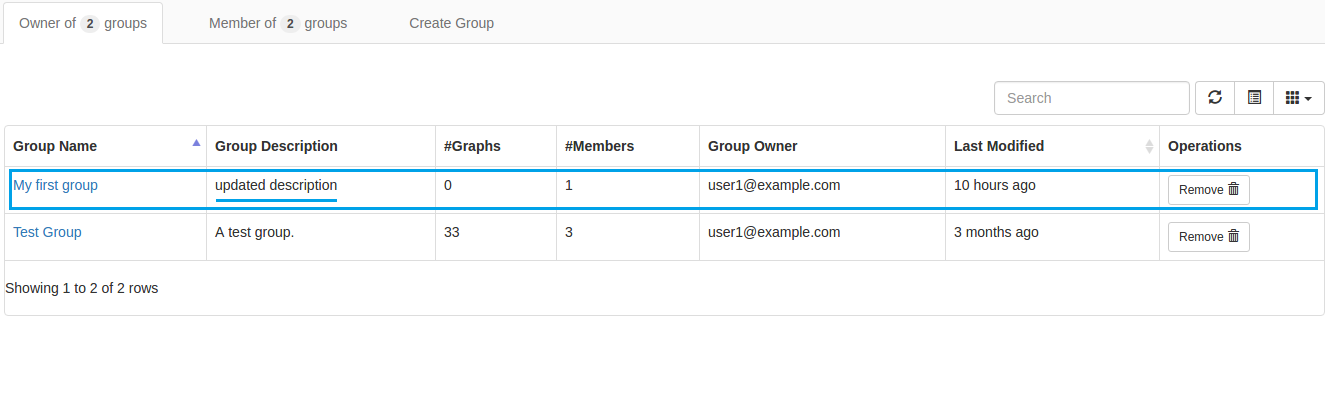
You can also view your updated group on GraphSpace.
If you also provide ‘group_name’ or ‘group_id’ as param then the update will be performed for that group having the given name or id:
>>> group1 = graphspace.update_group(group, group_id=198)
Fetching members of a group from GraphSpace
You can retrieve the members of your group anytime using the
get_group_members() method.
>>> members = graphspace.get_group_members(group_name='My first group')
>>> members[0].email
u'user1@example.com'
You can retrieve group members by group_id as well.
>>> members = graphspace.get_group_members(group_id=318)
>>> members[0].email
u'user1@example.com'
You can also retrieve members of a group by passing the group object itself as param.
>>> group = graphspace.get_group(group_name='My first group')
>>> members = graphspace.get_group_members(group=group)
>>> members[0].email
u'user1@example.com'
Adding a member to a group on GraphSpace
You can add a member to your group anytime using the
add_group_member() method.
>>> response = graphspace.add_group_member(member_email='user3@example.com', group_name='My first group')
>>> response['user_id']
2
You can add a group member by group_id as well.
>>> graphspace.add_group_member(member_email='user3@example.com', group_id=318)
{u'group_id': u'318', u'user_id': 2}
You can also add a group member to a group by passing the group object as param.
>>> group = graphspace.get_group(group_name='My first group')
>>> graphspace.add_group_member(member_email='user3@example.com', group=group)
{u'group_id': u'318', u'user_id': 2}
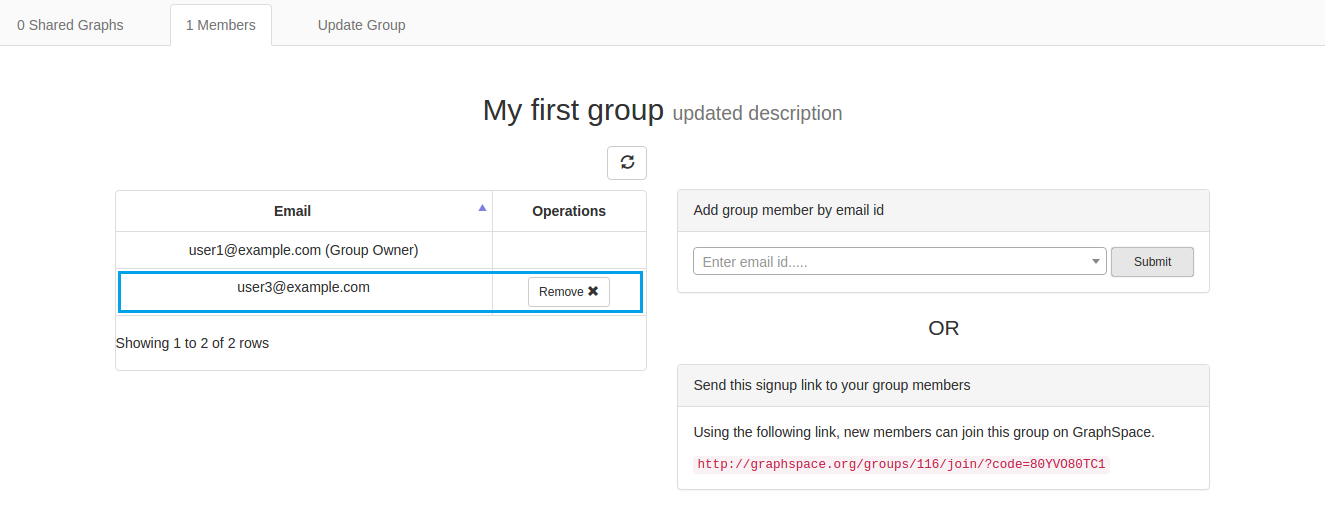
You can also view the added member on GraphSpace.
Deleting a member from a group on GraphSpace
You can delete a member from your group anytime using the
delete_group_member() method.
>>> graphspace.delete_group_member(member_id=2, group_name='My first group')
u'Successfully deleted member with id=2 from group with id=318'
You can delete a group member by group_id as well.
>>> graphspace.delete_group_member(member_id=2, group_id=318)
u'Successfully deleted member with id=2 from group with id=318'
You can also delete a group member by passing the group object as param.
>>> group = graphspace.get_group(group_name='My first group')
>>> graphspace.delete_group_member(member_id=2, group=group)
u'Successfully deleted member with id=2 from group with id=318'
Or you can also pass the member object directly.
>>> members = graphspace.get_group_members(group_name='My first group')
>>> graphspace.delete_group_member(member=members[0], group_name='My first group')
u'Successfully deleted member with id=2 from group with id=318'
Sharing a graph with a group
You can share a graph with your group anytime using the
share_graph() method.
>>> response = graphspace.share_graph(graph_id=34786, group_name='My first group')
>>> response['graph_id']
34786
You can share a graph with a group by group_id as well.
>>> graphspace.share_graph(graph_id=34786, group_id=318)
{u'created_at': u'2017-07-20T18:40:36.267052', u'group_id': u'318', u'graph_id':
34786, u'updated_at': u'2017-07-20T18:40:36.267052'}
You can also share a graph with a group by passing the group object as param.
>>> group = graphspace.get_group(group_name='My first group')
>>> graphspace.share_graph(graph_id=34786, group=group)
{u'created_at': u'2017-07-20T18:40:36.267052', u'group_id': u'318', u'graph_id':
34786, u'updated_at': u'2017-07-20T18:40:36.267052'}
You can also provide the graph name instead of id for sharing.
>>> graphspace.share_graph(graph_name='My Sample Graph', group_id=318)
{u'created_at': u'2017-07-20T18:40:36.267052', u'group_id': u'318', u'graph_id':
34786, u'updated_at': u'2017-07-20T18:40:36.267052'}
Or you can provide the graph object itself as param.
>>> graph = graphspace.get_graph(graph_name='My Sample Graph')
>>> graphspace.share_graph(graph=graph, group_id=318)
{u'created_at': u'2017-07-20T18:40:36.267052', u'group_id': u'318', u'graph_id':
34786, u'updated_at': u'2017-07-20T18:40:36.267052'}
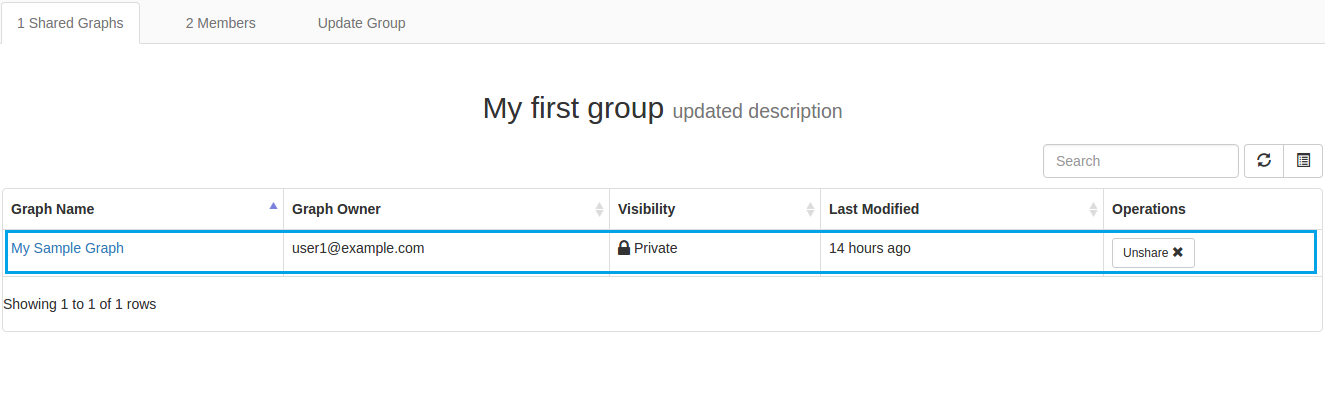
You can also view the shared graph on GraphSpace.
Unsharing a graph with a group
You can unshare a graph with your group anytime using the
unshare_graph() method.
>>> graphspace.unshare_graph(graph_id=34786, group_name='My first group')
u'Successfully deleted graph with id=34786 from group with id=318'
You can unshare a graph with a group by group_id as well.
>>> graphspace.unshare_graph(graph_id=34786, group_id=318)
u'Successfully deleted graph with id=34786 from group with id=318'
You can also unshare a graph with a group by passing the group object as param.
>>> group = graphspace.get_group(group_name='My first group')
>>> graphspace.unshare_graph(graph_id=34786, group=group)
u'Successfully deleted graph with id=34786 from group with id=318'
You can also provide the graph name instead of id for unsharing.
>>> graphspace.unshare_graph(graph_name='My Sample Graph', group_id=318)
u'Successfully deleted graph with id=34786 from group with id=318'
Or you can provide the graph object itself as param.
>>> graph = graphspace.get_graph(graph_name='My Sample Graph')
>>> graphspace.unshare_graph(graph=graph, group_id=318)
u'Successfully deleted graph with id=34786 from group with id=318'
Deleting a group on GraphSpace
You can also delete your group anytime using the
delete_group() method.
>>> graphspace.delete_group(group_name='My first group')
u'Successfully deleted group with id=318'
>>> assert graphspace.get_group(group_name='My first group') is None
You can delete a group by id as well.
>>> graphspace.delete_group(group_id=318)
u'Successfully deleted group with id=318'
You can also delete a group by passing the group object itself as param.
>>> group = graphspace.get_group(group_name='My first group')
>>> graphspace.delete_group(group=group)
u'Successfully deleted group with id=318'
Creating a legend
Create an empty legend.
>>> from graphspace_python.graphs.classes.gslegend import GSLegend
>>> Ld = GSLegend()
Adding legend key
You can add an individual legend key at a time by using the
add_legend_entries() method.
>>> # Adding a legend key with a given style and label
>>> style = {'background-color': 'black', 'shape':'star'}
>>> Ld.add_legend_entries('nodes', 'Receptor', style)
>>> # Get the json representation of legend
>>> Ld.get_legend_json()
{'legend': {'nodes': {'Receptor': {'background-color': 'black',
'shape': 'star'}}}}
>>> # Adding another legend key with a given style and label
>>> style = {'background-color': 'yellow', 'shape':'square'}
>>> Ld.add_legend_entries('nodes', 'Intermediate Protein', style)
>>> # Get the json representation of legend
>>> Ld.get_legend_json()
{'legend': {'nodes': {'Intermediate Protein': {'background-color': 'yellow',
'shape': 'square'}}}}
You can add JSON representation of legend at once by using the
set_legend_json() method.
>>> Ld = GSLegend()
>>> legend_json = {
    "legend":{
        "nodes":{
            "Source Receptor": {
                "shape":"triangle",
                "background-color":"#ff1400"
            }
        },
        "edges":{
            "Phosphorylation":{
                "line-color":"#0fcf25",
                "line-style":"solid",
                "arrow-shape":"triangle"
            }
        }
    }
}
>>> Ld.set_legend_json(legend_json)
>>> # Get the json representation of legend
>>> Ld.get_legend_json()
{'legend': {'edges': {'Phosphorylation': {'arrow-shape': 'triangle', 'line-color': '#0fcf25', 'line-style': 'solid'}}, 'nodes': {'Source Receptor': {'background-color': '#ff1400', 'shape': 'triangle'}}}}
Updating legend key
Setting a new style to an already present legend key will update its style.
>>> style = {'line-color': "#0fcf25", "line-style":"dashed", "arrow-shape":"triangle"}
>>> Ld.add_legend_entries('edges', 'Phosphorylation', style)
>>> # Get the json representation of legend
>>> Ld.get_legend_json()
{'legend': {'edges': {'Phosphorylation': {'arrow-shape': 'triangle', 'line-color': '#0fcf25', 'line-style': 'dashed'}}, 'nodes': {'Source Receptor': {'background-color': '#ff1400', 'shape': 'triangle'}}}}
Removing legend key
You can remove an individual legend key at a time by using the
remove_legend_entries() method.
>>> Ld.remove_legend_entries('nodes', 'Source Receptor')
>>> # Get the json representation of legend
>>> Ld.get_legend_json()
{'legend': {'edges': {'Phosphorylation': {'arrow-shape': 'triangle', 'line-color': '#0fcf25', 'line-style': 'solid'}}, 'nodes': {}}}
You can remove entire legend at once time by using the
delete_legend_json() method.
>>> Ld.delete_legend_json()
>>> # Get the json representation of legend
>>> Ld.get_legend_json()
{'legend': {}}
Creating a graph with legend
>>> from graphspace_python.graphs.classes.gsgraph import GSGraph
>>> from graphspace_python.graphs.classes.gslegend import GSLegend
>>> # Create an empty graph with no nodes and no edges.
>>> G = GSGraph()
>>> # Adding a node 'a' with a given popup and label
>>> G.add_node('a', popup='sample node popup text', label='A')
>>> G.nodes(data=True)
[('a', {'id': 'a', 'popup': 'sample node popup text', 'name': 'a',
'label': 'A'})]
>>> # Adding style information for node 'a'
>>> G.add_node_style('a', shape='ellipse', color='red', width=90, height=90)
>>> # Adding a node 'b' with a given popup and label
>>> G.add_node('b', popup='sample node popup text', label='B')
>>> G.nodes(data=True)
[('a', {'id': 'a', 'popup': 'sample node popup text', 'name': 'a',
'label': 'A'}), ('b', {'id': 'b', 'popup': 'sample node popup text',
'name': 'b', 'label': 'B'})]
>>> # Adding style information for node 'b'
>>> G.add_node_style('b', shape='triangle', color='blue', width=40, height=40)
# Adding an edge between node 'a' and node 'b'
>>> G.add_edge('a', 'b', directed=True, popup='sample edge popup')
>>> # Adding style information for edge
>>> G.add_edge_style('a', 'b', directed=True, edge_style='solid')
>>> # Creating an empty legend
>>> Ld = GSLegend()
>>> legend_json = {
    "legend":{
        "nodes":{
            "Source Receptor": {
                "shape":"ellipse",
                "background-color":"red"
            },
            "TF": {
                "shape":"triangle",
                "background-color":"blue"
            }
        },
        "edges":{
            "Phosphorylation":{
                "line-color":"black",
                "line-style":"solid",
                "arrow-shape":"triangle"
            }
        }
    }
}
>>> # Adding JSON representation of legend
>>> Ld.set_legend_json(legend_json)
>>> # Adding the legend 'Ld' to the graph 'G'.
>>> G.set_legend(Ld)
>>> # Retrieving the legend 'Ld' from the graph 'G'.
>>> Ld = G.get_legend()
>>> Ld.get_legend_json()
{'legend': {'edges': {'Phosphorylation': {'arrow-shape': 'triangle', 'line-color': 'black', 'line-style': 'solid'}}, 'nodes': {'Source Receptor': {'background-color': 'red', 'shape': 'ellipse'}, 'TF': {'background-color': 'blue', 'shape': 'triangle'}}}}
Creating a layout with legend
>>> from graphspace_python.graphs.classes.gslayout import GSLayout
>>> from graphspace_python.graphs.classes.gslegend import GSLegend
>>> # Create an empty layout with no node positions and style properties.
>>> L = GSLayout()
>>> # Setting position of a node 'a' with y and x coordinates
>>> L.set_node_position('a', y=38.5, x=67.3)
>>> # Setting position of a node 'b' with y and x coordinates
>>> L.set_node_position('b', y=124, x=332.2)
>>> # Add style for node 'a'
>>> L.add_node_style('a', shape='ellipse', color='red', width=60, height=60)
>>> # Add style for node 'b'
>>> L.add_node_style('b', shape='triangle', color='blue', width=60, height=60)
>>> # Add style for edge
>>> L.add_edge_style('a', 'b', directed=True, edge_style='solid')
>>> L.set_name('My Sample Layout')
>>> # Creating an empty legend
>>> Ld = GSLegend()
>>> legend_json = {
    "legend":{
        "nodes":{
            "Source Receptor": {
                "shape":"ellipse",
                "background-color":"red"
            },
            "TF": {
                "shape":"triangle",
                "background-color":"blue"
            }
        },
        "edges":{
            "Phosphorylation":{
                "line-color":"black",
                "line-style":"solid",
                "arrow-shape":"triangle"
            }
        }
    }
}
>>> # Adding JSON representation of legend
>>> Ld.set_legend_json(legend_json)
>>> # Adding the legend 'Ld' to the layout 'L'.
>>> L.set_legend(Ld)
>>> # Retrieving the legend 'Ld' from the layout 'L'.
>>> Ld = L.get_legend()
>>> Ld.get_legend_json()
{'legend': {'edges': {'Phosphorylation': {'arrow-shape': 'triangle', 'line-color': 'black', 'line-style': 'solid'}}, 'nodes': {'Source Receptor': {'background-color': 'red', 'shape': 'ellipse'}, 'TF': {'background-color': 'blue', 'shape': 'triangle'}}}}
Responses
Responses from the API are parsed into the respective object types.
Graphs endpoint responses
When response is a single Graph object:
>>> graph = graphspace.get_graph('My Sample Graph')
>>> graph.get_name()
u'My Sample Graph'
When response is a list of Graph objects:
>>> graphs = graphspace.get_my_graphs()
>>> graphs
[<Graph 1>, <Graph 2>, ...]
>>> graphs[0].get_name()
u'My Sample Graph'
Layouts endpoint responses
When response is a single Layout object:
>>> layout = graphspace.get_graph_layout(graph_id=21722, name='My Sample Layout')
>>> layout.get_name()
u'My Sample Layout'
When response is a list of Layout objects:
>>> layouts = graphspace.get_my_graph_layouts(graph_id=21722)
>>> layouts
[<Layout 1>, <Layout 2>, ...]
>>> layouts[0].get_name()
u'My Sample Layout'
Groups endpoint responses
When response is a single Group object:
>>> group = graphspace.get_group(name='My first group')
>>> group.get_name()
u'My first group'
When response is a list of Group objects:
>>> groups = graphspace.get_my_groups()
>>> groups
[<Group 1>, <Group 2>, ...]
>>> groups[0].get_name()
u'My first group'